What is Rest API?
Learn via video courses
Abstract
I believe you would have come across the COVID-19 tracking websites done by college students for their mini project in college. Do you know how they got their hands on that data? There is a possibility that they could have actually collect them all and update them periodically, but one would be insane to actually try that out. So how do they actually do it, then?
If you find yourself in this situation, where you are asked to build a COVID-19 tracking website, then the best thing to do is leverage the public APIs.
In this article you will learn what is an API, and also what is a REST API, how they work, how to build one and some of the best practices for you to follow when build your own REST API.
Introduction to API
An Application Program Interface referred to as an API is an architectural style that defines a set of rules to create web services that enable different programs to communicate with one another, transmit data, and integrate with them.
Let’s break this out with a simple and common real-life example.
Consider, you and your friends have gone out for a trip to visit Taj Mahal, you are all totally swept off by its beauty and forget the time totally. Suddenly, one of your friends say he/she is hungry, and every agree with his idea to find a good restaurant nearby. So you check for the nearest restaurant on Google Maps and reach there.
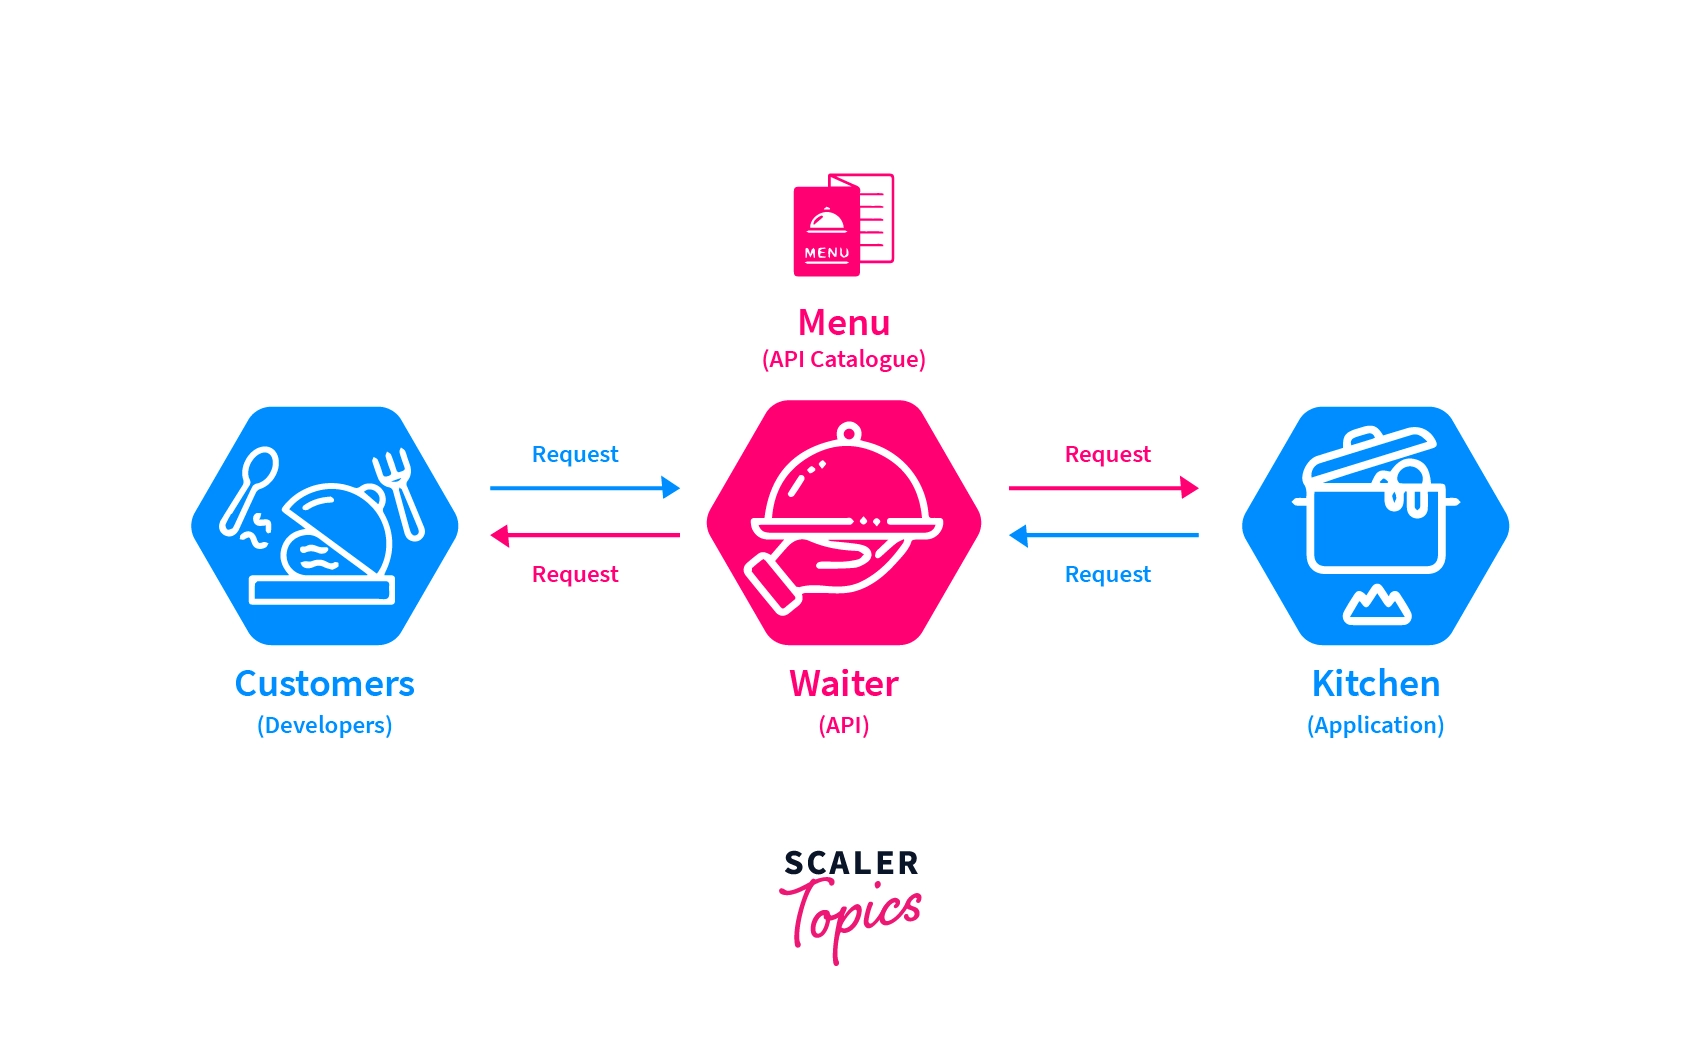
When you go to a restaurant, you don’t enter straight into the kitchen and give your order to the chef present there. You go and sit on a table waiting for a waiter to attend you. A waiter will come to your table, interact with you and get your orders. He will brief you on the menu and the dishes, then take your orders. He will then convey the orders to the chef present in side the kitchen. Once the chef prepares your dishes, the server will then fetch them back to you.
So, How is this anyway related to the question of what is an API? 🤔
What is an API?
An Application Program Interface referred to as an API is an architectural style that defines a set of rules to create web services that enable different programs to communicate with one another, transmit data, and integrate with them.
Let’s break this out with the same real-life example.
| In real life | In our story |
|---|---|
| Client | You/Customer |
| API | Waiter |
| Server | Kitchen/Chef |
| Data/Resource | Food |
Here the person ordering the food, you are the client. The waiter is the API, the kitchen/chef is the server, and the food is the resource requested by the client. When the client needs some resources, it requests them to the server via the API.
What is a REST API?
Now, that you know what is an API Another question will be pounding in your head, What is a REST API? And how is it different from regular APIs REST has its full meaning as REpresentational State Transfer.
An API can be called REST-FUL if it satisfies the REST architectural principles as stated below.
What does Representational state mean?
If you need to move on any further in this article, it is essential for you to understand this jargon, Representational State. Consider a social media platform that you use daily, say Instagram. On Instagram, you share the amazing moments of your life as pictures, videos as a post or a story, and you also comment, like and share on your friends’ posts. Of course there are other things, but they are not needed for this article.
So let’s now dive a layer deep into the working of the Instagram. The photo, the location, the caption, and others that you share as a post are known as a resource. These resources are stored on the server. So, when you open Instagram and scroll through your feed, you are requesting to the server for these resources. The server receiving the request will not just share a copy of the resource back to you. If you are wondering why can’t it just send a copy over, what trouble is it going to cause.
Just for a second, think that the servers are responding to the request with a copy of the resource. In the case of an Instagram post, there will be likes and comments; and likes are a pretty big thing on a platform with professional influencers, Right? So what would it take for someone to just change the like count of a post to 1 million and sent the updated resource back to the server. This should not be allowed, Right?
This totally spoils the integrity of the platform. So in order to avoid these unnecessary troubles, we share only the representation state of the resource.
When the server is requested for a resource, it shares the representation state of the resource to the client. The representation state consists of all the properties of the requested resource, and all the operations that can be performed on the resource. In the Instagram example we have considered, the pictures or the videos posted, the caption, the location, the persons tagged in them, the number of likes, and the comments are the properties of the post i.e. the resource.
The operations can be share, comment, save to your profile, and like or dislike (remove your like), because every user is given only one like so at any moment there can only be either like or dislike. The server will share these properties and the operations allowed for the user, as a response when requested for a resource, in a format that the client can easily understand and display in a meaningful manner to the user.
REST Design Principles
There are 6 design principles, 5 mandatory and 1 optional, that an API should satisfy in order to qualify as a REST API. These 6 principles were proposed by Dr. Roy Fielding in his 2000 Doctorate dissertation. These six principles are
Client-server Decoupling
This principle states that the client and the server components should be isolated from each other. The client should not be able to modify anything on the server-side. The server should not be able to modify anything on the client side. The interaction between the client and the server should always be via the API.
Okay, let’s try to understand the above-mentioned point using a simple experience that we all experience in our everyday life. We all use the Facebook app, so let’s take it as an example. Has this ever happened to you, you like or comment on your friend’s profile but due to maybe internet issues, the like or comment may not have reflected on your friend’s mobile, but the like or comment would still be visible in your mobile app.
The thing that is happening here is, the Facebook app we have on our mobile is the client, it fetches the data from the Facebook server and presents it to us. When you like or comment on something, it gets first updated locally on your mobile device and is also shared with the server. But owing to network issues, the data may not have been updated in the server. So when your friend uses Facebook on his mobile, he is fetching from the Facebook server, which at the moment has not updated your action, say like or comment. This is one typical example of client-server decoupling, that we come across in our daily life.
This helps us to independently work on the application and scale them without having the fear of breaking down things on the other.

Statelessness
Statelessness means that every request from the client to the server should contain all the required information to serve the request. The API should not rely on any information stored on the server, such as, information related to the session to serve the client’s request. The server should not store any data related to the client’s request. This may give way to a question as “If the server has no information of me stored, then how does it identify me?”
You are not logging on into your Facebook account every time you use it. You might have logged on to it some time back and unless you log out of your account, you will not be asked to sign back in. And every time you visit Facebook.com, you are greeted with your profile page. So how does this happens, how does the server know that you are the one accessing the Facebook page, and not me?
Once you log in to your Facebook account for the first time on a browser, you are telling the server that “I am the person who owns this account”. Now a session has been established. Every action you ever make, from now on will be associated with the account that has been logged on some moments ago with that exact same browser, on that exact same computer.
The time period during which the server recognizes you with your account without asking for your credentials again is called sessions. A session ends when you log out of your account, or until you reset the browser. I totally hear the question pounding inside your head “But, If REST APIs are completely stateless and are not allowed to store any information on the server side, then how can they identify myself to my account? How are these so-called “sessions” are being handled?”
When the server responds to your first login attempt, it will gather every information that might ever need to identify this computer and this browser, and send them back to the client along with your Facebook feed. These so-called “collection of information necessary to identify the user again” is called a cookie.
Remember the annoying popups that you encounter whenever you open a new page, hope you understood the purpose of that.


The Statelessness property allows the server to treat each request as a single task and eliminates the need to store it. This also reduces the server’s memory drastically, since it only has to store the information of the current request. This can reduce the server overload. This also enables multiple connection that can be dropped off at the server’s end without any loss and increase the number of requests handled.
Since there are no session or state related information stored on the server, you can deploy the API to multiple servers and scale the application easily.
Cacheable
Caching is the process of storing the most recently used data, so that if it’s requested again it can be accessed from the cache, this saves a lot of time. Since we don’t have to send the request to the server and wait for it to respond to us with the data.
This principle states that every response from the server should be implicitly or explicitly mentioned as cacheable or non-cacheable, i.e., whether it can be cached or not. For cacheable response, the time period for which the response is valid must also be specified.
So, now when a client makes a request, we check for its availability in the local cache. If it's available in the cache, we then check whether the data is still valid, and if it is valid, then the request is not forwarded to the server, the data is just fetched from the local cache. If otherwise, such as not available or not valid, then the request is forwarded to the server.
This increases the scalability of the server, by reducing the workload of repeated and unwanted requests.
Uniform Interface
Imagine you are in need of important information, and only one person can give them to you at the moment, but the person only knows 1 language, say Tamil, for example. And you on the other hand don’t know Tamil, then how will you communicate with him/her then? You will find a person who knows both the languages and ask him to be an intermediate and help you have the conversation.
The same is the case with machines, a client may or may not use the same tech stack as the server, and may be built on a different architecture and perform the functions differently than the server. So, essentially they are in need of an intermediate component that can help them understand each other. That is the purpose of having a uniform interface.
The uniform interface lets the client communicate with the server in a single language, independent of the architectural backend of either. This interface should provide an unchanging, standardized means of communicating between the client and the server This property allows the client and the server to evolve independently. There are four constraints that must be satisfied to develop a uniform interface. They are
Resource Identification
This states that any request for a resource should look similar, irrespective of where the request is made from. This is achieved by using Uniform Resource Identifiers, commonly known as URI, to identify every resource.
Ex: a record with the user ID 193 in the user table can have a URI as user_table/193
There are some industry approved best practices that you should keep in mind when working the Resource Identification, They are:
Using Nouns for URIs
Rest APIs are usually developed to interact with resources. A URI (Uniform Resource Identifier) represents the location of a resource in the given server, like articles/6 represents the 6th article in the given website. It is always a best practice to use nouns to represent the resources.
Ex: use articles/123 instead of write/123
Use Plural Naming Convention
When using names for a resource’s URI, it is always advised to use plural names to represent a collection of similar resources.
Ex: use articles/123 instead of article/123
Make the Resource Hierarchy Visible
Since we are always working on a collection of resources, it is always best to make the resource hierarchy visible to the end-user. The best place to do this is in the resource’s URI.
Ex: a URI articles/123 can be easily understood that it denotes the 123rd entry in the articles' collection.
Self-descriptive Communications
The communication method should be self-descriptive. The name of the method should describe the function it is going to perform. Most RESTful APIs use the HTTP request format for Resource manipulation through representation.
As mentioned earlier, only the representation of the actual data should be transmitted. Thus, any manipulation of the actual data should be through the representation that has been returned to the client through the server.
Let’s understand it with our Instagram example, when you request for a post, the representation state of the resource is transferred back to the client. If you want to like a picture, you will just double-click on the post on your Instagram app. The double click on the post will not just increase the like count of the post by 1, it will initiate the operation like or dislike that is defined in the representational state of the resource. The operation will take place on the server side and perform the desired function and update the state of the resource in the server side. Even when you are offline, if you like a picture you may find the like count increasing, but it is just the front-end, and it is temporary. If you reset the application, the like will not be reflected on the post.
The representation can be of any form, such as JSON or XML.
Apart from these methods, there will be also be other methods that lets us manipulate the state of the resource, such as a method to increment/decrement the like count on a post. These methods should be given proper names that describe the operation the method performs in a nutshell.
Hypermedia as the Search Engine
The term hypermedia refers to any media that contains links to something else, any other media content, such as a text, image, audio, or video, etc. the hypermedia works the same as any other hyperlinks in a webpage. This lets the client navigate through the hypermedia to find the desired resource.
Layered System
REST supports layered system architecture. In layered system architecture, we can have many intermediate layers in between the client and the server. Each layer will be responsible for a performing a separate function. These functions can be Authentication, Caching, Load Balancing, Data manipulation, and much more based on the requirements of the application.
For example, consider the scenario of liking a post on Instagram. This action can be broken down into multiple parts, such as authenticating the user, whether he has already liked the post or not, and then increment the like count of the post based on the result from the previous process. One thing to note here is that the order in which these operations are carried out, If you change the order or perform it parallelly it would not make any sense and might break the application.
The layered system architecture provides many benefits such as scalability, shared caching, encapsulation, and more. The number of intermediate layers can also increase the overhead and latency and can affect the performance of the application in the eye’s of the user. So we have to be careful in designing this.
Code on Demand (optional)
This is an optional principle that you can choose to follow if you find it useful for your application. This allows code or applet (a simple program that performs a single task) to be transmitted via the API to use within the application. This empowers the client to run the code in its own backend, such as a java applet program running on the client’s operating system.
How REST APIs Work?
The servers, when requested for a resource, such as text, audio, video, or any form of data, create a response object of the resource, requested by the client. Then transfers the representational state of the object in a standardized format over the internet.
Hence, the name REpresentational State Transfer. Any complex operation that has to be performed on the resource will be broken down to into individual modules. And then each of these modules are executed on different layers in a logical order as previously explained under the layered system design principle. This approach thus provides greater benefits, such as flexibility and scalability.
Why Use REST API?
So why is the need to follow these constraints, what benefits are there in developing your API in accordance with these constraints? So let’s see, the reason, why it is better to design an API that qualifies as a REST API?
Flexibility
REST APIs can handle many types of requests and can also share data in many formats such as JSON, YAML, XML, ETC. This provides a greater degree of flexibility.
Scalability
Since they are designed to communicate between two pieces of the software regardless of size or capability, we can individually scale one part of the application without concern about the other.
Independent
The data is not tied to any particular resource or method. So REST APIs can test different areas in multiple environments while still in development.
Easy integration
The REST API’s uniform interface principle ensures that the API will function in the same manner irrespective of the source from which the request comes from. So you can easily integrate the same API in another application.
REST API Best Practices
-
Allow filtering, pagination, and sorting Since we are always working with a huge collection of resources, filtering, pagination, and sorting help us work with them faster.
* Filtering: Lets the user limit the result to certain criteria.
Ex: a certain topic or date can be used to filter a set of articles
* Pagination : No one likes to scroll through a list of endless results. So limiting the result to a certain amount per page will make it easier to work with.
* Sorting : Sorting enables the user to look through the order in which the user wishes to.
Ex: sorting the articles based on the ratings in descending order to find the most rated articles. -
Error Handling We can’t be sure that the API will always work as expected and not throw any errors over. It is a necessary thing to handle all the errors and present them to the user, in a user-friendly way. It is a best practice to use the standard HTTP error codes to group common errors, since it would also benefit if someone else wants to integrate your API in their project.
Here are the standard HTTP error codes for some of the most common error codes and what the error message it represents.

- API Documentation A good Documentation is always helpful for new users. They can read and learn about how to work with your API, and all the things it can perform, and how to use it properly. So never forget to create well-crafted Documentation for your API.
Methods of REST API
REST APIs are designed for the purpose of interacting with a large set of database. There are only three operations that we might perform on a database, they are commonly referred with the acronym of CRUD. CRUD expands to Create, Retrieve, Update, and Delete.
These are the only 4 might operations that we will ever perform on any database. We can use the HTTP methods to perform these operations. The methods and the operation they perform are already explained under the self-descriptive messages heading listed above. But still, I will explain it again here.


How to create a REST API?
Now that you know everything you need to about a REST API, let's look at how you can create one. We will create a simple REST API using Node.js.
Step 1:
Create a directory for your first REST API using the mkdir command and move into the directory.
Create a node project by using the command node init
This initializes a node project and also creates a packages.json, but we will not be using the packages.json file for this article. We initialize this directory so that we can use the Node.js runtime to run the API.
Create a new file named server.js in the directory using the touch command or file menu
Step 2:
Now we are gonna start to create an API. For the sake of keeping it simple, I am going to show you just an outline of how to create a REST API for a menu card of a restaurant. I will just leave the methods for you to complete.
Import the required modules
Create a server called REST_API using the http module's create server method.
You will be adding your codes within this function until you complete
step 3
Parse the url using url module’s parse method, so that you can easily access the information you need such as the data, url, path name, and the method used.
Let’s first see how to handle a post request -
You will have to first check for the method, whether it is GET, POST, PUT or Delete. Then you will have to check the path to find out what you have to add.
Here we check for the path and the type of request to decide what to perform. Now when we get a POST request from the path ‘/api/restaurants/dishes’ we add the dish to the menu. The implementation of the method should be done, but is skipped in this article, considering that this is just an example.
In a similar manner we check for the other paths and request type using else if conditionals and perform the desired action.
We are checking for the exact path name only in POST method and in GET method to get all the dishes. For others, We are checking if the path name starts with the given route because the data will be appended in the URL for these methods.
It’s now up to you to create all the inner methods to perform all those purposes. You can write them within the create server function or anywhere within this file.
There can be a possibility that all these if conditionals may fail, so we have to create an else condition for those situations.
Step 3:
You have successfully created a REST API, but now you have to mention the port it has to use.
This tells that the API should listen to port 4000 for requests. You can use any port number of your choice in this place.
You can find the entire code structure in this link A simple javascript file that explains the simple structure of creating a REST API using Node.js, (github.com)
Step 4:
You have completed the coding part of your first REST API. But still, you have not yet deployed it.
It’s time to get back on the terminal now.
Open this folder on your terminal and type this command.
This command tells the node runtime to run the server.js file. This is why we initialized npm in this directory in the first step.
Your First-ever REST API is now running on port 4000, Congratulations 🥳🎉
Let’s take a quick recap and try to understand how our API makes use of the best practices.
RECAP:
If you look back at your new REST API, you will see that we have followed all the best practices,
- The client and server here are essentially decoupled, and our API is the only way for them to communicate with each other.
- We are not storing any data of the client on the server.
- You should mention whether the response is cacheable or not, and their validity period, when you implement the methods.
- Since this is a simple example, we have not used a layered architecture, but when the complexity of the transactions increases it is better to use a layered architecture.
- We have used nouns in the plural form to represent the resources, such as restaurants, and dishes.
- We have used proper resource hierarchy, e.g., restaurants/dishes can easily be understood that they are the dishes of the given restaurant
- We have also added an else condition in case there occurs any error to handle those situations.
Conclusion:
In this article, you learned about
- What is an API?
- How is a REST API different from an ordinary API?
- REST API design principles
- REST API best practices
- How to create a simple REST API and deploy it in your local machine.
A good understanding of APIs is necessary for every software developer. Because, Any project is always broken into small modules and assigned to individual teams, and then finally integrated into one single product. So most of the time, APIs are created so that they can be reused in other projects if found necessary. I am sure that you will find the concepts and ideas mentioned in this article very helpful.
That’s all for now, folks! .Thanks for reading 😊